Zin om dit bosje bloemen te haken? Dan laat ik je hier zien hoe ik het heb gedaan.
Feel like crocheting this little bouquet? I'll show you how it's done.
Materiaal
Aluminium draad
 |
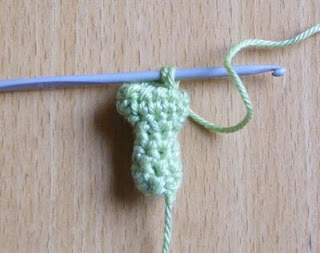
Maak een magische ring met 6v. Haak 3 toeren 6v. Haak dan een toer 2in1, je hebt 12 steken. Vervolgens nog 1 toer 12v.
Make a magic ring with 6 sc. Three rows 6 sc. One row 2in1, now there are 12 stitches. One row 12 sc. |
 |
Hecht een nieuwe kleur aan. Haak steeds 10 lossen, maak een hv in de volgende steek. Je krijgt zo 11 blaadjes.
Cast on a new colour and make 10 chains. Make a slip stitch in the next stitch. Repeat throughout the row. You'll have 11 leafs.
|
 |
Maak nu steeds 15 lossen en werk achter de blaadjes van de vorige toer. Maak elke lossen ketting vast met een hv achter het vorige blaadje langs in dezelfde steek waar de hv van het kleine blaadje ook in zit.
Make 15 chains en work behind the leafs of the last row. Attach every chain with a slip stitch behind the leaf of the last row in the same stitch of the slip stitch of the small leaf. |
 |
Ik hoop dat deze foto iets duidelijker laat zien waar de halve vaste van de grotere blaadjes moet komen.
I hope this pictures shows more clearly where the slip stitch of the bigger leafs should be |
 |
Zo ziet je bloemetje eruit als het klaar is. Plak er een wolkraal in.
This is what your flower looks like when ready. Paste a felt bead in it. |
 |
Neem nu een stukje aluminium draad en haak eromheen.
Now take a piece of aluminium wire and crochet around it. |
 |
Zo ziet het eruit als het klaar is. Laat een lang draadeinde over.
This is what it looks like finished. Leave a long yarn end. |
 |
Naai de bloem aan de stengel.
Attach the flower |
 |
Wikkel het garen eromheen en hect af.
Wrap the yarn around it and batch of. |
Geniet van je zelfgehaakte bosje bloemen! Omdat het aluminium draad heel buigzaam is kun je de bloemen natuurlijk ook ergens omheen wikkelen.
Enjoy your handmade bouquet! The aluminium wire is very flexibel so you can also wrap the flowers around something to decorate.


